How to Build a Sweet Climbing Wall
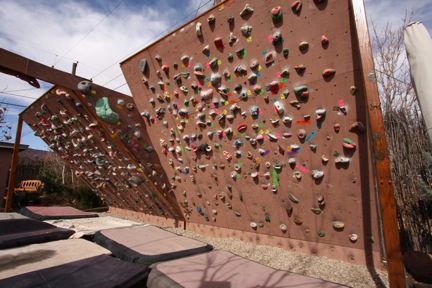
Hi, Steph i would like to know how did you build that wall. What did you did to make it stand without a wall to anchor it. I am from the island of Puerto Rico. I build a wall in my backyard but it doesnt look as good a yours!
Andre
Dear Andre,
My climbing wall was designed and built by my friend Noah Bigwood, an amazing climber and builder. Basically my climbing wall expertise consists of wanting one and knowing the right person to go to….Noah 🙂 I can’t say enough about how great my wall is, and I also climb a lot on another wall that Noah built, which is equally wonderful. He definitely knows what he is doing.
In the 8 years I’ve had this great wall (and it has lasted perfectly all that time, outdoors) so many people ask me about wall construction, I finally decided to ask Noah for yet another wall favor….to share some of his knowledge! Thanks Noah!!
Hi Steph,
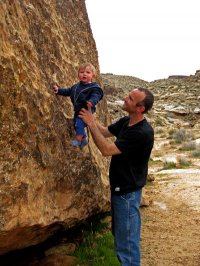
You asked if I would post something about wall construction, so here it is.
There are some very basic principles which should be employed when building your own climbing wall. Unfortunately, most climbers build their own walls on a very tight budget and this leads to the use of inferior materials, not enough T-nuts and sub par designs. If you are building a climbing wall you should think of it the same way you would think of building a house in that it will be around for a long time and you will (hopefully) use it a lot, so wait to begin until you have the funds to do it right. You can also scale back your ambitions for the size of the initial wall and leave room to expand in the future.
The best home walls that I have climbed on all have a few things in common, they all have very few inside corners (dihedrals), they all are made of thick (3/4 inch plywood or osb) with strong framing behind (2×6 on 16 inch centers or 2×4 on 12 inch centers) and they have a plentiful supply of T-nuts.
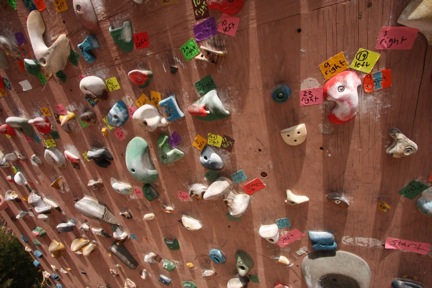
With this in mind, figure out where you want to put your wall, inside walls are great and last longer, but outside walls can be a lot of fun too and are generally bigger and less cramped feeling. Inside walls generally have several advantages over outside walls. First, you will have strong walls and ceilings to attach your framing to which gives you the ability to design steep walls with no posts supporting them and second, you don’t need to worry about weather proofing them. Outdoor walls can be taller and larger, but you need to develop a system to support them and weather proof them and you will need to create a landing area which will be clean and safe.
Generally speaking, you will probably get better training value out of a long single angle wall than a more ambitious multiple angle wall. Don’t feel like you need to design something complicated, try to figure out the simplest design that will fit your space and your needs. For an indoor wall, I recommend using 2×6 douglas fir studs for your framing and 3/4 ac plywood. For outdoor walls use 2×6 pressure treated studs and 3/4 inch exterior grade plywood (acx). Place T-nuts on an 8-12 inch grid (be sure that you locate the framing before laying out the grid so that T-nuts won’t be located on framing). You can place far fewer T-nuts down low for the feet since you will probably use screw on jibs down there.
Outdoor walls will typically require far more planning and preparation than indoor ones since you need to create a structure that can support itself and the force of climbers yanking their way to uber-strength, not to mention snow loads, and high winds. I should also mention that all walls (but especially outdoors) are subject to local building codes and permits are probably required even if nearly all walls are built “under the radar” you can get into trouble if you use this approach.
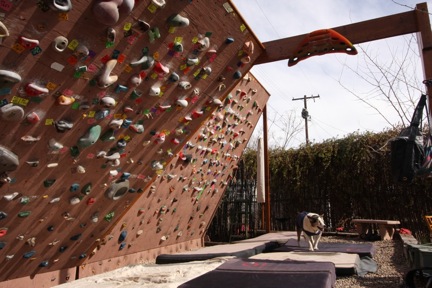
There are three basic ways to create a solid outdoor wall: First, a self supporting A-frame in which two walls are placed opposite each other, anchored at their bases and “leaning” against one another. Second, a counter balance wall in which the wall is supported from behind by either a solid framing connection to the ground well behind the wall, or often by cables, chains or beams to the ground behind the wall.
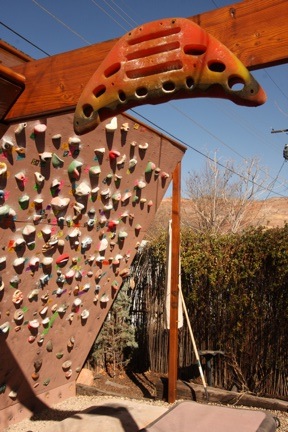
Thirdly, a wall like Steph’s where the framing extends via a “bearing beam” through the center of the wall to a safe (from falling or flying climbers) distance and where both ends have diagonal supports attached to long solid base framing. I strongly recommend putting down a gravel base under the entire area before you begin since it will promote good drainage and gives you a clean area for pads and hanging out. Be sure to put some kind of roof on the back and top of your outdoor wall to protect the framing and prevent leakage through the face of the wall.
I could go on and on, but that should get people started. Good luck and remember to keep it strong, simple and put a lot of T-nuts in. then find a group of friends who want to train with you on your sweet new wall.
Noah



Great post, Steph! Thanks for sharing Noah’s expertise. I have two telephone poles with cement footers in my back yard (yes, I know…) that are remnants of a zip line, and I’m looking forward to giving them a new life as the support for a home wall. These tips are great.
This is a great article, and I have been planning a climbing wall that is strongly influenced by this design. I was just wondering how tall is this wall? In my plans, I have most of my wall at 10′ and then a 2′ extension on top of that for the main overhang. Is 12′ (with 10′ at 45 degrees and a 2′ headwall) tall enough for a good climb/workout?
Hi Kirk, Yes, that is plenty tall….just remember, if it’s too tall, you never really set hard moves at the top, so it ends up not being as useful to go up too high. Just make sure you have enough width to make long problems.
🙂 Steph
is there a way to weatherproof the wall?
like to prevent it from water damage and rotting?
Hi Andrew,
My wall has corrugated metal roofing on the back, and it doesn’t seem to get wet on the steep side. Sun damage is a real problem in Moab. I painted the plywood, which protects it, and treated the wood beams with Sikkens UV treatment. The wood would definitely have rotted from the sun if I hadn’t given it several coats of Sikkens over the last 7 years, but it has held up great. Moab is a super dry climate, so you might not be able to do an outdoor, open-air wall if you are in a very wet place.
Hi Steph,
I am looking into building a bouldering wall as well and am wondering what sort of price tag comes with this masterpiece of yours? Truly awesome! Looks like so much fun!
Hi Macy,
It has been several years, but at the time, I remember I was unpleasantly surprised at the cost of plywood! Also, the t-nuts are more expensive than you would expect. I think it cost at least $1000 to build, not including the holds, but I could have blocked the full cost from my memory 🙂 Still, I have been using it for almost ten years now, and I get so much use and enjoyment out of it, I think the cost has balanced out over time. It shows no signs of degrading, and I expect it to last for as long as I want it to.
Is there a recommendation of how to orient the wall? The site I am considering naturally faces south… I am worried that the sun damage will be a problem. Is that a concern?
I also wonder if the angled overhang will help with this? Maybe I could have a metal roofing system and an overhang to help shade and protect the top? Any thoughts?
Hi Tray, it’s definitely good to consider the orientation. My wall gets sun through the day, and in the winter, when the path of the sun is lower, it gets even more direct sun. So this is great for winter climbing, but my wall is basically out of season in the summer and warm spring/fall times. I planted trees in front of it, to get more shade in the hotter season. An overhang helps with that too, if shade is what you are after. As far as damage, I put paint on my plywood, and that has seemed to do a great job of preserving the wood. My friend Lisa actually enclosed her wall, so she can run a heater or a swamp cooler and be able to climb when it’s too hot or too cold, which is pretty key. However, I do love being outside on my wall, and I also like being able to take advantage of winter sun with it. So you should consider all these thoughts before building and choosing the site.
good luck!
what are the holds made of? Can I make my ow?
they are usually made of some kind of plastic. but you can make your own holds out of wood, or by drilling pieces of rock you find yourself….sometimes those are great.
Hi Steph,
Thank you so much for the info:) Amazing wall! Kudos to Noah as well.
What are the angles used for both walls?
Many thanks again
Hi Steph,
Did you put any kind of cover or “roof” on the back-side, or it it exposed?
We put corrugated metal on the back, and it seems to be lasting very well (that protects it from rain/snow and sun). The only downside is you can’t go back there to replace t-nuts. I have had one t-nut go bad (in 10 years), so it’s not a huge issue. But make sure to pound the t-nuts in really well, and be careful with them when putting the holds in, because you really don’t want to get lots of spinners.
What angles are the two walls shown? Are you happy with those or would you suggest going steeper?
I’ll have to check and measure them: if I had to guess, I’d say about 25 and 35 degrees. I think they are great–when it gets too steep, it becomes a different sort of climbing.
How many feet wide is your wall altogether, including both angled walls?
Also, what is the height of your walls?
Could you please PLEASE pleas take a photo of the rear of the wall I love this design I hope you don’t mind if I could copy it? How did you weather treat the plywood ?
Hi Zach, I’ve been trying to get a decent photo, but it’s hard to get back there because there’s a fence right behind it. For weather: the back is roofed with corrugated sheet metal, and the front sides are painted with regular house paint.
[…] Davis of High Places & Simple Living had her fence turned into a climbing […]
I know this is an old post but any chance you can post suggestions for establishing the landing area? I’m currently hauling all my crash pads outside to my training wall whenever I want to climb, but it would be great to have a more permanent solution.